Question 1 Topic 3, Lucerne Publishing
SIMULATION
Instructions
nvironment
nterface and Controls
The exam panel provides access to the project task(s). Each project has an associated file in which you will perform the
project tasks.
1. Project file
2. Split bar
3. Exam panel
You can modify the exam interface to fit your needs in the following ways:
To increase or decrease the exam panel font size, press Ctrl+Plus or Ctrl+Minus.
To change the height of the exam panel, drag the split bar between the project file and the exam panel.
To minimize the exam panel, click the Collapse Panel arrow
in the upper-left corner of the exam panel. The minimized
exam panel displays the Expand Panel button, the project number and name, the remaining time, and the Restart Project
and Submit Project buttons. To move between tasks, you must expand the exam panel. To restore the interface to the
default appearance, click the Restore button near the upper-right corner of the exam panel.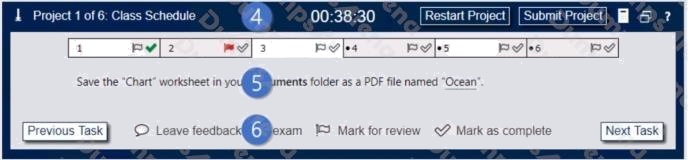
4. The Information bar at the top of the exam panel displays the current project and total number of projects, the remaining
exam time, and the following commands: Collapse Panel. Minimizes the exam panel to provide more space for the project
file.
Restart Project. Closes and reopens the current project file without saving your changes.
Submit Project. Saves your changes, submits the project file, and moves to the next project.
Calculator. A calculator is available in some exams. You are not required to use the calculator.
Restore. Restores the size and position of the project file and exam panel to the defaults. Help. Displays information about
the exam interface.
5. The Content area displays the task tabs and the current task description.
6. The Navigation area at the bottom of the exam panel contains the following commands.
Previous Task/Next Task. Saves your response and moves to the previous or next task in the current project.
Leave feedback after exam. Flags the task to indicate that you want to leave feedback about it after the exam.
Mark for review. Flags the task to indicate that you want to return to it before you finish the exam. Mark as complete. Flags
the task to indicate that you feel you have completed the task.
In projects that contain multiple tasks, you can switch between tasks by clicking the task tab, Next Task button, or Previous
Task button.
End of the instructions.
You work for Lucerne Publishing. You are compiling sales and royalty data for authors the company represents.
Configure Excel to disable all macros in the workbook without notification.
Exhibit 1 (exhibit):
Exhibit 2 (exhibit):
Exhibit 3 (exhibit):
Exhibit 4 (exhibit):
Exhibit 5 (exhibit):
Exhibit 6 (exhibit):
Answer:
See explanation below.
Explanation:
Click the File tab.
Click Options.
Click Trust Center, and then click Trust Center Settings.
In the Trust Center, click Macro Settings.
Select the Disable all macros without notification option. Click OK.
Reference: https://support.microsoft.com/en-us/office/enable-or-disable-macros-in-office-files-12b036fd-d140-4e74-b45e-
16fed1a7e5c6
Comments
Question 2 Topic 3, Lucerne Publishing
SIMULATION
Instructions
nvironment
nterface and Controls
The exam panel provides access to the project task(s). Each project has an associated file in which you will perform the
project tasks.
1. Project file
2. Split bar
3. Exam panel
You can modify the exam interface to fit your needs in the following ways:
To increase or decrease the exam panel font size, press Ctrl+Plus or Ctrl+Minus.
To change the height of the exam panel, drag the split bar between the project file and the exam panel.
To minimize the exam panel, click the Collapse Panel arrow
in the upper-left corner of the exam panel. The minimized
exam panel displays the Expand Panel button, the project number and name, the remaining time, and the Restart Project
and Submit Project buttons. To move between tasks, you must expand the exam panel. To restore the interface to the
default appearance, click the Restore button near the upper-right corner of the exam panel.
4. The Information bar at the top of the exam panel displays the current project and total number of projects, the remaining
exam time, and the following commands: Collapse Panel. Minimizes the exam panel to provide more space for the project
file.
Restart Project. Closes and reopens the current project file without saving your changes.
Submit Project. Saves your changes, submits the project file, and moves to the next project.
Calculator. A calculator is available in some exams. You are not required to use the calculator.
Restore. Restores the size and position of the project file and exam panel to the defaults. Help. Displays information about
the exam interface.
5. The Content area displays the task tabs and the current task description.
6. The Navigation area at the bottom of the exam panel contains the following commands.
Previous Task/Next Task. Saves your response and moves to the previous or next task in the current project.
Leave feedback after exam. Flags the task to indicate that you want to leave feedback about it after the exam.
Mark for review. Flags the task to indicate that you want to return to it before you finish the exam. Mark as complete. Flags
the task to indicate that you feel you have completed the task.
In projects that contain multiple tasks, you can switch between tasks by clicking the task tab, Next Task button, or Previous
Task button.
End of the instructions.
On the New Titles worksheet, for cells E4:E24, create and apply a custom number format that displays the dates in the
format 2020 January 01.
Exhibit 1 (exhibit):
Exhibit 2 (exhibit):
Exhibit 3 (exhibit):
Exhibit 4 (exhibit):
Exhibit 5 (exhibit):
Exhibit 6 (exhibit):
Answer:
See explanation below.
Explanation:
1. Select the cells you want to format.
2. Press CTRL+1.
3. In the Format Cells box, click the Number tab.
4. In the Category list, click Date, and then choose a date format you want in Type. You can adjust this format in the last step
below.
5. Go back to the Category list, and choose Custom. Under Type, youll see the format code for the date format you chose in
the previous step. The built-in date format cant be changed, so dont worry about messing it up. The changes you make will
only apply to the custom format youre creating.
6. In the Type box, make the changes you want using code from the table below. In our case, yyyy mmmm dd.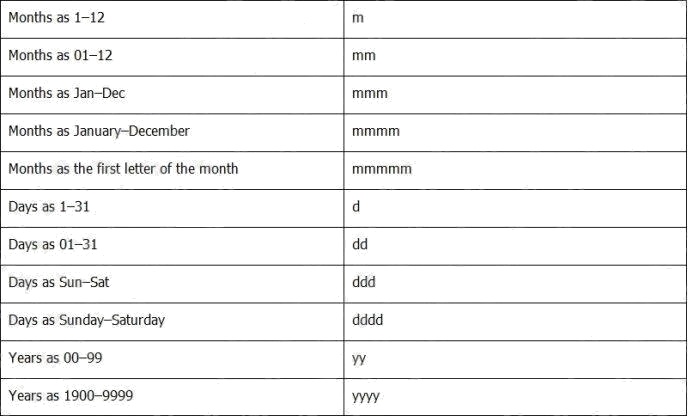
7. Click OK.
Reference:
https://support.microsoft.com/en-us/office/format-a-date-the-way-you-want-8e10019e-d5d8-47a1-ba95-db95123d273e
Comments
Question 3 Topic 3, Lucerne Publishing
SIMULATION
Instructions
nvironment
nterface and Controls
The exam panel provides access to the project task(s). Each project has an associated file in which you will perform the
project tasks.
1. Project file
2. Split bar
3. Exam panel
You can modify the exam interface to fit your needs in the following ways:
To increase or decrease the exam panel font size, press Ctrl+Plus or Ctrl+Minus.
To change the height of the exam panel, drag the split bar between the project file and the exam panel.
To minimize the exam panel, click the Collapse Panel arrow
in the upper-left corner of the exam panel. The minimized
exam panel displays the Expand Panel button, the project number and name, the remaining time, and the Restart Project
and Submit Project buttons. To move between tasks, you must expand the exam panel.
To restore the interface to the default appearance, click the Restore button near the upper-right corner of the exam panel.
4. The Information bar at the top of the exam panel displays the current project and total number of projects, the remaining
exam time, and the following commands: Collapse Panel. Minimizes the exam panel to provide more space for the project
file.
Restart Project. Closes and reopens the current project file without saving your changes.
Submit Project. Saves your changes, submits the project file, and moves to the next project.
Calculator. A calculator is available in some exams. You are not required to use the calculator.
Restore. Restores the size and position of the project file and exam panel to the defaults. Help. Displays information about
the exam interface.
5. The Content area displays the task tabs and the current task description.
6. The Navigation area at the bottom of the exam panel contains the following commands.
Previous Task/Next Task. Saves your response and moves to the previous or next task in the current project.
Leave feedback after exam. Flags the task to indicate that you want to leave feedback about it after the exam.
Mark for review. Flags the task to indicate that you want to return to it before you finish the exam. Mark as complete. Flags
the task to indicate that you feel you have completed the task.
In projects that contain multiple tasks, you can switch between tasks by clicking the task tab, Next Task button, or Previous
Task button.
End of the instructions.
On the Royalties worksheet, the existing formula in the Royalty Due column calculates the royalties due to each author.
On cell F4, modify the existing formula to return the amount of royalties due to the author only if the amount is greater than
$25, and otherwise returns 0.
Exhibit 1 (exhibit):
Exhibit 2 (exhibit):
Exhibit 3 (exhibit):
Exhibit 4 (exhibit):
Exhibit 5 (exhibit):
Exhibit 6 (exhibit):
Answer:
See explanation below.
Explanation:
You need to added reference an IF function to the current formula.
The modified formula should resemble the following: =IF(currentformula>25,currentformula,0)
Reference:
https://support.microsoft.com/en-us/office/use-nested-functions-in-a-formula-9d7c966d-6030-4cd6-a052-
478d7d844166?ui=en-us&rs=en-us&ad=us
Comments
Question 4 Topic 3, Lucerne Publishing
SIMULATION
Instructions
nvironment
nterface and Controls
The exam panel provides access to the project task(s). Each project has an associated file in which you will perform the
project tasks.
1. Project file
2. Split bar
3. Exam panel
You can modify the exam interface to fit your needs in the following ways:
To increase or decrease the exam panel font size, press Ctrl+Plus or Ctrl+Minus.
To change the height of the exam panel, drag the split bar between the project file and the exam panel.
To minimize the exam panel, click the Collapse Panel arrow
in the upper-left corner of the exam panel. The minimized
exam panel displays the Expand Panel button, the project number and name, the remaining time, and the Restart Project
and Submit Project buttons. To move between tasks, you must expand the exam panel. To restore the interface to the
default appearance, click the Restore button near the upper-right corner of the exam panel.
4. The Information bar at the top of the exam panel displays the current project and total number of projects, the remaining
exam time, and the following commands: Collapse Panel. Minimizes the exam panel to provide more space for the project
file.
Restart Project. Closes and reopens the current project file without saving your changes.
Submit Project. Saves your changes, submits the project file, and moves to the next project.
Calculator. A calculator is available in some exams. You are not required to use the calculator.
Restore. Restores the size and position of the project file and exam panel to the defaults. Help. Displays information about
the exam interface.
5. The Content area displays the task tabs and the current task description.
6. The Navigation area at the bottom of the exam panel contains the following commands.
Previous Task/Next Task. Saves your response and moves to the previous or next task in the current project.
Leave feedback after exam. Flags the task to indicate that you want to leave feedback about it after the exam.
Mark for review. Flags the task to indicate that you want to return to it before you finish the exam. Mark as complete. Flags
the task to indicate that you feel you have completed the task.
In projects that contain multiple tasks, you can switch between tasks by clicking the task tab, Next Task button, or Previous
Task button.
End of the instructions.
On the Sales Analysis worksheet, insert a slicer that allows users to filter the PivotTable by Category. Then use the slicer
to display only Psychology books.
The slicer size and position do not matter.
Exhibit 1 (exhibit):
Exhibit 2 (exhibit):
Exhibit 3 (exhibit):
Exhibit 4 (exhibit):
Exhibit 5 (exhibit):
Exhibit 6 (exhibit):
Answer:
See explanation below.
Explanation:
1. Click anywhere in the table or PivotTable.
2. On the Home tab, go to Insert > Slicer.
3. In the Insert Slicers dialog box, select the check boxes for the fields you want to display, then select OK.
4. A slicer will be created for every field that you selected. Clicking any of the slicer buttons will automatically apply that filter
to the linked table or PivotTable.
Reference:
https://support.microsoft.com/en-us/office/use-slicers-to-filter-data-249f966b-a9d5-4b0f-b31a-
12651785d29d#:~:text=On%20the%20Home%20tab%2C%20go,the%20linked%20table%20or% 20PivotTable.
Comments
Question 5 Topic 3, Lucerne Publishing
SIMULATION
Instructions
nvironment
nterface and Controls
The exam panel provides access to the project task(s). Each project has an associated file in which you will perform the
project tasks.
1. Project file
2. Split bar
3. Exam panel
You can modify the exam interface to fit your needs in the following ways:
To increase or decrease the exam panel font size, press Ctrl+Plus or Ctrl+Minus.
To change the height of the exam panel, drag the split bar between the project file and the exam panel.
To minimize the exam panel, click the Collapse Panel arrow
in the upper-left corner of the exam panel. The minimized
exam panel displays the Expand Panel button, the project number and name, the remaining time, and the Restart Project
and Submit Project buttons. To move between tasks, you must expand the exam panel. To restore the interface to the
default appearance, click the Restore button near the upper-right corner of the exam panel.
4. The Information bar at the top of the exam panel displays the current project and total number of projects, the remaining
exam time, and the following commands: Collapse Panel. Minimizes the exam panel to provide more space for the project
file.
Restart Project. Closes and reopens the current project file without saving your changes.
Submit Project. Saves your changes, submits the project file, and moves to the next project.
Calculator. A calculator is available in some exams. You are not required to use the calculator.
Restore. Restores the size and position of the project file and exam panel to the defaults. Help. Displays information about
the exam interface.
5. The Content area displays the task tabs and the current task description.
6. The Navigation area at the bottom of the exam panel contains the following commands.
Previous Task/Next Task. Saves your response and moves to the previous or next task in the current project.
Leave feedback after exam. Flags the task to indicate that you want to leave feedback about it after the exam.
Mark for review. Flags the task to indicate that you want to return to it before you finish the exam. Mark as complete. Flags
the task to indicate that you feel you have completed the task.
In projects that contain multiple tasks, you can switch between tasks by clicking the task tab, Next Task button, or Previous
Task button.
End of the instructions.
On the Royalty Analysis worksheet, add the Title ID field as a PivotChart filter. Apply the filter to the chart to display only
results for title ID CO20.
Exhibit 1 (exhibit):
Exhibit 2 (exhibit):
Exhibit 3 (exhibit):
Exhibit 4 (exhibit):
Exhibit 5 (exhibit):
Exhibit 6 (exhibit):
Answer:
See explanation below.
Explanation:
In the PivotTable Field list, click on the field that you want to use as a Report Filter. Drag the field into the Filters box.
On the worksheet, Excel adds the selected field to the top of the pivot table, with the item (All) showing. The values in the
pivot table do not change. Click the Report Filter's drop-down arrow, to see a list of items in the field. Click on an item to
select it, and click OK.
Reference: https://contextures.com/Excel-Pivot-Table-Report-Filters.html
Topic 4, Ski Lessons
Comments
Question 6 Topic 4, Ski Lessons
SIMULATION
Instructions
nvironment
nterface and Controls
The exam panel provides access to the project task(s). Each project has an associated file in which you will perform the
project tasks.
1. Project file
2. Split bar
3. Exam panel
You can modify the exam interface to fit your needs in the following ways:
To increase or decrease the exam panel font size, press Ctrl+Plus or Ctrl+Minus.
To change the height of the exam panel, drag the split bar between the project file and the exam panel.
To minimize the exam panel, click the Collapse Panel arrow
in the upper-left corner of the exam panel. The minimized
exam panel displays the Expand Panel button, the project number and name, the remaining time, and the Restart Project
and Submit Project buttons. To move between tasks, you must expand the exam panel. To restore the interface to the
default appearance, click the Restore button near the upper-right corner of the exam panel.
4. The Information bar at the top of the exam panel displays the current project and total number of projects, the remaining
exam time, and the following commands: Collapse Panel. Minimizes the exam panel to provide more space for the project
file.
Restart Project. Closes and reopens the current project file without saving your changes.
Submit Project. Saves your changes, submits the project file, and moves to the next project.
Calculator. A calculator is available in some exams. You are not required to use the calculator.
Restore. Restores the size and position of the project file and exam panel to the defaults. Help. Displays information about
the exam interface.
5. The Content area displays the task tabs and the current task description.
6. The Navigation area at the bottom of the exam panel contains the following commands.
Previous Task/Next Task. Saves your response and moves to the previous or next task in the current project.
Leave feedback after exam. Flags the task to indicate that you want to leave feedback about it after the exam.
Mark for review. Flags the task to indicate that you want to return to it before you finish the exam. Mark as complete. Flags
the task to indicate that you feel you have completed the task.
In projects that contain multiple tasks, you can switch between tasks by clicking the task tab, Next Task button, or Previous
Task button.
End of the instructions.
This project has only one task.
Configure Excel to automatically evaluate formulas only when a workbook is saved, and not each time data changes.
Exhibit 1 (exhibit):
Exhibit 2 (exhibit):
Answer:
See explanation below.
Explanation:
1. Click File in the ribbon.
2. And then click Options.
3. In the Excel Options, choose the Formulas.
4. And then in the Calculation Options, check the option Manual.
5. Check the Recalculate workbook before saving option.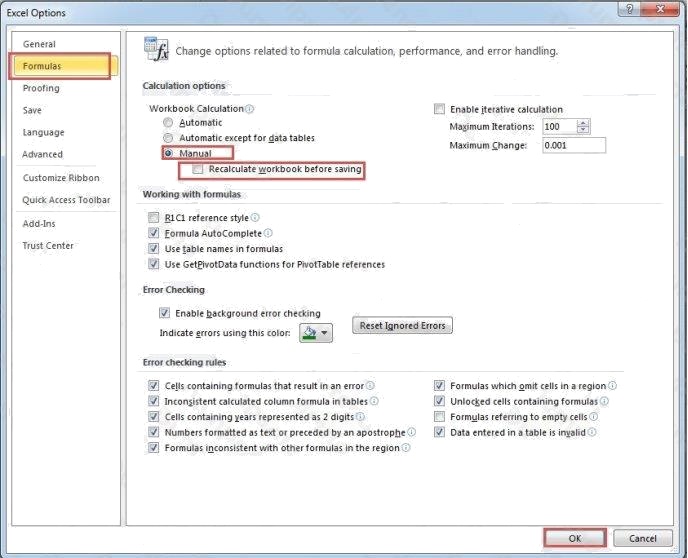
6. And then click OK in the window.
7. Next save the workbook.
Reference: https://www.datanumen.com/blogs/prevent-excel-auto-calculating-updating-data-workbook/
Topic 5, VanArsdel Limited
Comments
Question 7 Topic 5, VanArsdel Limited
SIMULATION
Instructions
nvironment
nterface and Controls
The exam panel provides access to the project task(s). Each project has an associated file in which you will perform the
project tasks.
1. Project file
2. Split bar
3. Exam panel
You can modify the exam interface to fit your needs in the following ways:
To increase or decrease the exam panel font size, press Ctrl+Plus or Ctrl+Minus.
To change the height of the exam panel, drag the split bar between the project file and the exam panel.
To minimize the exam panel, click the Collapse Panel arrow
in the upper-left corner of the exam panel. The minimized
exam panel displays the Expand Panel button, the project number and name, the remaining time, and the Restart Project
and Submit Project buttons. To move between tasks, you must expand the exam panel. To restore the interface to the
default appearance, click the Restore button near the upper-right corner of the exam panel.
4. The Information bar at the top of the exam panel displays the current project and total number of projects, the remaining
exam time, and the following commands: Collapse Panel. Minimizes the exam panel to provide more space for the project
file.
Restart Project. Closes and reopens the current project file without saving your changes.
Submit Project. Saves your changes, submits the project file, and moves to the next project.
Calculator. A calculator is available in some exams. You are not required to use the calculator.
Restore. Restores the size and position of the project file and exam panel to the defaults. Help. Displays information about
the exam interface.
5. The Content area displays the task tabs and the current task description.
6. The Navigation area at the bottom of the exam panel contains the following commands.
Previous Task/Next Task. Saves your response and moves to the previous or next task in the current project.
Leave feedback after exam. Flags the task to indicate that you want to leave feedback about it after the exam.
Mark for review. Flags the task to indicate that you want to return to it before you finish the exam. Mark as complete. Flags
the task to indicate that you feel you have completed the task.
In projects that contain multiple tasks, you can switch between tasks by clicking the task tab, Next Task button, or Previous
Task button.
End of the instructions.
You are creating a workbook for VanArsdel Limiteds annual sales meeting.
Require that users enter the password P@ssword before they can make structural changes to the workbook.
Exhibit 1 (exhibit):
Exhibit 2 (exhibit):
Exhibit 3 (exhibit):
Exhibit 4 (exhibit):
Exhibit 5 (exhibit):
Answer:
See explanation below.
Explanation:
1. Click Review > Protect Workbook.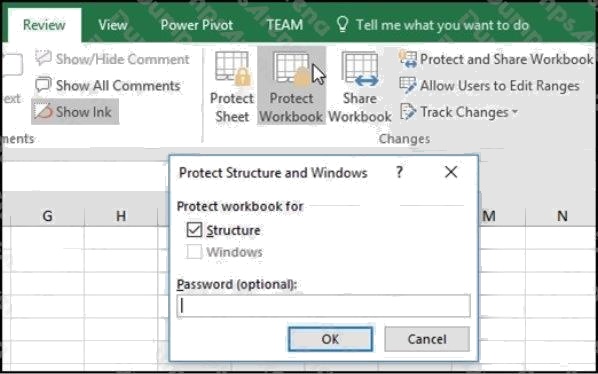
2. Enter a password in the Password box.
3. Click OK, and retype the password to confirm it, and then click OK.
Reference:
https://support.microsoft.com/en-us/office/protect-a-workbook-7e365a4d-3e89-4616-84ca-1931257c1517
Comments
Question 8 Topic 5, VanArsdel Limited
SIMULATION
Instructions
nvironment
nterface and Controls
The exam panel provides access to the project task(s). Each project has an associated file in which you will perform the
project tasks.
1. Project file
2. Split bar
3. Exam panel
You can modify the exam interface to fit your needs in the following ways:
To increase or decrease the exam panel font size, press Ctrl+Plus or Ctrl+Minus.
To change the height of the exam panel, drag the split bar between the project file and the exam panel.
To minimize the exam panel, click the Collapse Panel arrow
in the upper-left corner of the exam panel. The minimized
exam panel displays the Expand Panel button, the project number and name, the remaining time, and the Restart Project
and Submit Project buttons. To move between tasks, you must expand the exam panel. To restore the interface to the
default appearance, click the Restore button near the upper-right corner of the exam panel.
4. The Information bar at the top of the exam panel displays the current project and total number of projects, the remaining
exam time, and the following commands: Collapse Panel. Minimizes the exam panel to provide more space for the project
file.
Restart Project. Closes and reopens the current project file without saving your changes.
Submit Project. Saves your changes, submits the project file, and moves to the next project.
Calculator. A calculator is available in some exams. You are not required to use the calculator.
Restore. Restores the size and position of the project file and exam panel to the defaults. Help. Displays information about
the exam interface.
5. The Content area displays the task tabs and the current task description.
6. The Navigation area at the bottom of the exam panel contains the following commands.
Previous Task/Next Task. Saves your response and moves to the previous or next task in the current project.
Leave feedback after exam. Flags the task to indicate that you want to leave feedback about it after the exam.
Mark for review. Flags the task to indicate that you want to return to it before you finish the exam. Mark as complete. Flags
the task to indicate that you feel you have completed the task.
In projects that contain multiple tasks, you can switch between tasks by clicking the task tab, Next Task button, or Previous
Task button.
End of the instructions.
On the Sales Conference worksheet, configure cells A4:A12 to allow only whole numbers from 1 to 9. Otherwise, display a
Stop error with the title Invalid and the message 1 to 9.
Exhibit 1 (exhibit):
Exhibit 2 (exhibit):
Exhibit 3 (exhibit):
Exhibit 4 (exhibit):
Exhibit 5 (exhibit):
Answer:
See explanation below.
Explanation:
1. Select the cell(s) you want to create a rule for.
2. Select Data >Data Validation.
3. On the Settings tab, under Allow, select an option:
Whole Number - to restrict the cell to accept only whole numbers.
Decimal - to restrict the cell to accept only decimal numbers.
List - to pick data from the drop-down list.
Date - to restrict the cell to accept only date.
Time - to restrict the cell to accept only time.
Text Length - to restrict the length of the text.
Custom for custom formula.
4. Under Data, select a condition:
between not between equal to not equal to greater than less than
greater than or equal to less than or equal to
5. On the Settings tab, under Allow, select an option:
6. Set the other required values, based on what you chose for Allow and Data. For example, if you select between, then
select the Minimum: and Maximum: values for the cell(s).
7. Select the Ignore blank checkbox if you want to ignore blank spaces.
8. If you want to add a Title and message for your rule, select the Input Message tab, and then type a title and input
message.
9. Select the Show input message when cell is selected checkbox to display the message when the user selects or hovers
over the selected cell(s).
10. Select OK.Now, if the user tries to enter a value that is not valid, a pop-up appears with the message, This value doesnt
match the data validation restrictions for this cell.
Reference: https://support.microsoft.com/en-us/office/apply-data-validation-to-cells-29fecbcc-d1b9-42c1-9d76-
eff3ce5f7249?ui=en-us&rs=en-us&ad=us
Comments
Question 9 Topic 5, VanArsdel Limited
SIMULATION
Instructions
nvironment
nterface and Controls
The exam panel provides access to the project task(s). Each project has an associated file in which you will perform the
project tasks.
1. Project file
2. Split bar
3. Exam panel
You can modify the exam interface to fit your needs in the following ways:
To increase or decrease the exam panel font size, press Ctrl+Plus or Ctrl+Minus.
To change the height of the exam panel, drag the split bar between the project file and the exam panel.
To minimize the exam panel, click the Collapse Panel arrow
in the upper-left corner of the exam panel. The minimized
exam panel displays the Expand Panel button, the project number and name, the remaining time, and the Restart Project
and Submit Project buttons. To move between tasks, you must expand the exam panel. To restore the interface to the
default appearance, click the Restore button near the upper-right corner of the exam panel.
4. The Information bar at the top of the exam panel displays the current project and total number of projects, the remaining
exam time, and the following commands: Collapse Panel. Minimizes the exam panel to provide more space for the project
file.
Restart Project. Closes and reopens the current project file without saving your changes.
Submit Project. Saves your changes, submits the project file, and moves to the next project.
Calculator. A calculator is available in some exams. You are not required to use the calculator.
Restore. Restores the size and position of the project file and exam panel to the defaults. Help. Displays information about
the exam interface.
5. The Content area displays the task tabs and the current task description.
6. The Navigation area at the bottom of the exam panel contains the following commands.
Previous Task/Next Task. Saves your response and moves to the previous or next task in the current project.
Leave feedback after exam. Flags the task to indicate that you want to leave feedback about it after the exam.
Mark for review. Flags the task to indicate that you want to return to it before you finish the exam. Mark as complete. Flags
the task to indicate that you feel you have completed the task.
In projects that contain multiple tasks, you can switch between tasks by clicking the task tab, Next Task button, or Previous
Task button.
End of the instructions.
On the Year-to-Date Sales worksheet, in cells L5:L15, enter a formula that returns the average Total Sales for the region
in cell J5 and the Representative in cell K5.
Exhibit 1 (exhibit):
Exhibit 2 (exhibit):
Exhibit 3 (exhibit):
Exhibit 4 (exhibit):
Exhibit 5 (exhibit):
Answer:
See explanation below.
Explanation:
Click in Cell L5, and select Formulas from the ribbon.
Click on the arrow of the AutoSum button in the Function Library section, and select Average. Click on Cell H4, H5, H6, then
press Enter.The formula should look like this:=AVERAGE(H4,H5,H6)
Reference:
https://support.microsoft.com/en-us/office/average-function-047bac88-d466-426c-a32b-8f33eb960cf6
Comments
Question 10 Topic 5, VanArsdel Limited
SIMULATION
Instructions
nvironment
nterface and Controls
The exam panel provides access to the project task(s). Each project has an associated file in which you will perform the
project tasks.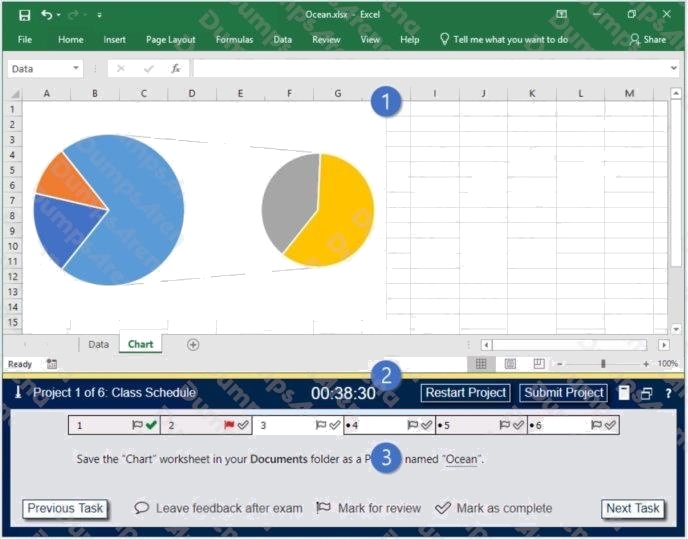
1. Project file
2. Split bar
3. Exam panel
You can modify the exam interface to fit your needs in the following ways:
To increase or decrease the exam panel font size, press Ctrl+Plus or Ctrl+Minus.
To change the height of the exam panel, drag the split bar between the project file and the exam panel.
To minimize the exam panel, click the Collapse Panel arrow
in the upper-left corner of the exam panel. The minimized
exam panel displays the Expand Panel button, the project number and name, the remaining time, and the Restart Project
and Submit Project buttons. To move between tasks, you must expand the exam panel. To restore the interface to the
default appearance, click the Restore button near the upper-right corner of the exam panel.
4. The Information bar at the top of the exam panel displays the current project and total number of projects, the remaining
exam time, and the following commands: Collapse Panel. Minimizes the exam panel to provide more space for the project
file.
Restart Project. Closes and reopens the current project file without saving your changes.
Submit Project. Saves your changes, submits the project file, and moves to the next project.
Calculator. A calculator is available in some exams. You are not required to use the calculator.
Restore. Restores the size and position of the project file and exam panel to the defaults. Help. Displays information about
the exam interface.
5. The Content area displays the task tabs and the current task description.
6. The Navigation area at the bottom of the exam panel contains the following commands.
Previous Task/Next Task. Saves your response and moves to the previous or next task in the current project. Leave
feedback after exam. Flags the task to indicate that you want to leave feedback about it after the exam.
Mark for review. Flags the task to indicate that you want to return to it before you finish the exam. Mark as complete. Flags
the task to indicate that you feel you have completed the task.
In projects that contain multiple tasks, you can switch between tasks by clicking the task tab, Next Task button, or Previous
Task button.
End of the instructions.
On the Sales Summary worksheet, create one chart that displays each representatives Total Sales as an Area chart and
the Grand Total Percentage as a secondary axis Line chart.
The chart size and position do not matter.
Exhibit 1 (exhibit):
Exhibit 2 (exhibit):
Exhibit 3 (exhibit):
Exhibit 4 (exhibit):
Exhibit 5 (exhibit):
Answer:
See explanation below.
Explanation:
1. Select the range.
2. On the Insert tab, in the Charts group, click the Combo symbol.
3. Click Create Custom Combo Chart.
The Insert Chart dialog box appears.
4. For the Total Sales series, choose Area as the chart type.
5. For the Grand Total Percentage series, choose Line as the chart type.
6. Plot the Grand Total Percentage series on the secondary axis.
7. Click OK.
Reference: https://www.excel-easy.com/examples/combination-chart.html
Comments
Page 1 out of 2
Viewing questions 1-10 out of 25
page 2