Question 1
As part of an upcoming release of an application, a new nullable field is added to a table that
contains customer dat
a. The new field is used by a report in the upcoming release and is calculated using data from
another table.
Which two actions should you consider when creating the script to add the new field?
- A. Create a script that adds the field and leaves it null.
- B. Create a rollback script that removes the field.
- C. Create a script that adds the field and then populates it.
- D. Create a rollback script that clears the data from the field.
- E. Add a view that joins the customer data to the data used in calculation.
Answer:
B, C
Explanation:
Comprehensive and Detailed In-Depth Explanation:
As an Appian Lead Developer, adding a new nullable field to a database table for an upcoming
release requires careful planning to ensure data integrity, report functionality, and rollback capability.
The field is used in a report and calculated from another table, so the script must handle both
deployment and potential reversibility. Let’s evaluate each option:
A . Create a script that adds the field and leaves it null:
Adding a nullable field and leaving it null is technically feasible (e.g., using ALTER TABLE ADD
COLUMN in SQL), but it doesn’t address the report’s need for calculated data. Since the field is used
in a report and calculated from another table, leaving it null risks incomplete or incorrect reporting
until populated, delaying functionality. Appian’s data management best practices recommend
populating data during deployment for immediate usability, making this insufficient as a standalone
action.
B . Create a rollback script that removes the field:
This is a critical action. In Appian, database changes (e.g., adding a field) must be reversible in case of
deployment failure or rollback needs (e.g., during testing or PROD issues). A rollback script that
removes the field (e.g., ALTER TABLE DROP COLUMN) ensures the database can return to its original
state, minimizing risk. Appian’s deployment guidelines emphasize rollback scripts for schema
changes, making this essential for safe releases.
C . Create a script that adds the field and then populates it:
This is also essential. Since the field is nullable, calculated from another table, and used in a report,
populating it during deployment ensures immediate functionality. The script can use SQL (e.g.,
UPDATE table SET new_field = (SELECT calculated_value FROM other_table WHERE condition)) to
populate data, aligning with Appian’s data fabric principles for maintaining data consistency.
Appian’s documentation recommends populating new fields during deployment for reporting
accuracy, making this a key action.
D . Create a rollback script that clears the data from the field:
Clearing data (e.g., UPDATE table SET new_field = NULL) is less effective than removing the field
entirely. If the deployment fails, the field’s existence with null values could confuse reports or
processes, requiring additional cleanup. Appian’s rollback strategies favor reverting schema changes
completely (removing the field) rather than leaving it with nulls, making this less reliable and
unnecessary compared to B.
E . Add a view that joins the customer data to the data used in calculation:
Creating a view (e.g., CREATE VIEW customer_report AS SELECT ... FROM customer_table JOIN
other_table ON ...) is useful for reporting but isn’t a prerequisite for adding the field. The scenario
focuses on the field addition and population, not reporting structure. While a view could optimize
queries, it’s a secondary step, not a primary action for the script itself. Appian’s data modeling best
practices suggest views as post-deployment optimizations, not script requirements.
Conclusion: The two actions to consider are B (create a rollback script that removes the field) and C
(create a script that adds the field and then populates it). These ensure the field is added with data
for immediate report usability and provide a safe rollback option, aligning with Appian’s deployment
and data management standards for schema changes.
Reference:
Appian Documentation: "Database Schema Changes" (Adding Fields and Rollback Scripts).
Appian Lead Developer Certification: Data Management Module (Schema Deployment Strategies).
Appian Best Practices: "Managing Data Changes in Production" (Populating and Rolling Back Fields).
Comments
Question 2
You are the lead developer for an Appian project, in a backlog refinement meeting. You are
presented with the following user story:
“As a restaurant customer, I need to be able to place my food order online to avoid waiting in line for
takeout.”
Which two functional acceptance criteria would you consider ‘good’?
- A. The user will click Save, and the order information will be saved in the ORDER table and have audit history.
- B. The user will receive an email notification when their order is completed.
- C. The system must handle up to 500 unique orders per day.
- D. The user cannot submit the form without filling out all required fields.
Answer:
A, D
Explanation:
Comprehensive and Detailed In-Depth Explanation:
As an Appian Lead Developer, defining “good” functional acceptance criteria for a user story requires
ensuring they are specific, testable, and directly tied to the user’s need (placing an online food order
to avoid waiting in line). Good criteria focus on functionality, usability, and reliability, aligning with
Appian’s Agile and design best practices. Let’s evaluate each option:
A . The user will click Save, and the order information will be saved in the ORDER table and have
audit history:
This is a “good” criterion. It directly validates the core functionality of the user story—placing an
order online. Saving order data in the ORDER table (likely via a process model or Data Store Entity)
ensures persistence, and audit history (e.g., using Appian’s audit logs or database triggers) tracks
changes, supporting traceability and compliance. This is specific, testable (e.g., verify data in the
table and logs), and essential for the user’s goal, aligning with Appian’s data management and user
experience guidelines.
B . The user will receive an email notification when their order is completed:
While useful, this is a “nice-to-have” enhancement, not a core requirement of the user story. The
story focuses on placing an order online to avoid waiting, not on completion notifications. Email
notifications add value but aren’t essential for validating the primary functionality. Appian’s user
story best practices prioritize criteria tied to the main user need, making this secondary and not
“good” in this context.
C . The system must handle up to 500 unique orders per day:
This is a non-functional requirement (performance/scalability), not a functional acceptance criterion.
It describes system capacity, not specific user behavior or functionality. While important for design,
it’s not directly testable for the user story’s outcome (placing an order) and isn’t tied to the user’s
experience. Appian’s Agile methodologies separate functional and non-functional requirements,
making this less relevant as a “good” criterion here.
D . The user cannot submit the form without filling out all required fields:
This is a “good” criterion. It ensures data integrity and usability by preventing incomplete orders,
directly supporting the user’s ability to place a valid online order. In Appian, this can be implemented
using form validation (e.g., required attributes in SAIL interfaces or process model validations),
making it specific, testable (e.g., verify form submission fails with missing fields), and critical for a
reliable user experience. This aligns with Appian’s UI design and user story validation standards.
Conclusion: The two “good” functional acceptance criteria are A (order saved with audit history) and
D (required fields enforced). These directly validate the user story’s functionality (placing a valid
order online), are testable, and ensure a reliable, user-friendly experience—aligning with Appian’s
Agile and design best practices for user stories.
Reference:
Appian Documentation: "Writing Effective User Stories and Acceptance Criteria" (Functional
Requirements).
Appian Lead Developer Certification: Agile Development Module (Acceptance Criteria Best
Practices).
Appian Best Practices: "Designing User Interfaces in Appian" (Form Validation and Data Persistence).
Comments
Question 3
You are designing a process that is anticipated to be executed multiple times a day. This process
retrieves data from an external system and then calls various utility processes as needed. The main
process will not use the results of the utility processes, and there are no user forms anywhere.
Which design choice should be used to start the utility processes and minimize the load on the
execution engines?
- A. Use the Start Process Smart Service to start the utility processes.
- B. Start the utility processes via a subprocess synchronously.
- C. Use Process Messaging to start the utility process.
- D. Start the utility processes via a subprocess asynchronously.
Answer:
D
Explanation:
Comprehensive and Detailed In-Depth Explanation:
As an Appian Lead Developer, designing a process that executes frequently (multiple times a day)
and calls utility processes without using their results requires optimizing performance and
minimizing load on Appian’s execution engines. The absence of user forms indicates a backend
process, so user experience isn’t a concern—only engine efficiency matters. Let’s evaluate each
option:
A . Use the Start Process Smart Service to start the utility processes:
The Start Process Smart Service launches a new process instance independently, creating a separate
process in the Work Queue. While functional, it increases engine load because each utility process
runs as a distinct instance, consuming engine resources and potentially clogging the Java Work
Queue, especially with frequent executions. Appian’s performance guidelines discourage
unnecessary separate process instances for utility tasks, favoring integrated subprocesses, making
this less optimal.
B . Start the utility processes via a subprocess synchronously:
Synchronous subprocesses (e.g., a!startProcess with isAsync: false) execute within the main process
flow, blocking until completion. For utility processes not used by the main process, this creates
unnecessary delays, increasing execution time and engine load. With frequent daily executions,
synchronous subprocesses could strain engines, especially if utility processes are slow or numerous.
Appian’s documentation recommends asynchronous execution for non-dependent, non-blocking
tasks, ruling this out.
C . Use Process Messaging to start the utility process:
Process Messaging (e.g., sendMessage() in Appian) is used for inter-process communication, not for
starting processes. It’s designed to pass data between running processes, not initiate new ones.
Attempting to use it for starting utility processes would require additional setup (e.g., a listening
process) and isn’t a standard or efficient method. Appian’s messaging features are for coordination,
not process initiation, making this inappropriate.
D . Start the utility processes via a subprocess asynchronously:
This is the best choice. Asynchronous subprocesses (e.g., a!startProcess with isAsync: true) execute
independently of the main process, offloading work to the engine without blocking or delaying the
parent process. Since the main process doesn’t use the utility process results and there are no user
forms, asynchronous execution minimizes engine load by distributing tasks across time, reducing
Work Queue pressure during frequent executions. Appian’s performance best practices recommend
asynchronous subprocesses for non-dependent, utility tasks to optimize engine utilization, making
this ideal for minimizing load.
Conclusion: Starting the utility processes via a subprocess asynchronously (D) minimizes engine load
by allowing independent execution without blocking the main process, aligning with Appian’s
performance optimization strategies for frequent, backend processes.
Reference:
Appian Documentation: "Process Model Performance" (Synchronous vs. Asynchronous
Subprocesses).
Appian Lead Developer Certification: Process Design Module (Optimizing Engine Load).
Appian Best Practices: "Designing Efficient Utility Processes" (Asynchronous Execution).
Comments
Question 4
As part of your implementation workflow, users need to retrieve data stored in a third-party Oracle
database on an interface. You need to design a way to query this information.
How should you set up this connection and query the data?
- A. Configure a Query Database node within the process model. Then, type in the connection information, as well as a SQL query to execute and return the data in process variables.
- B. Configure a timed utility process that queries data from the third-party database daily, and stores it in the Appian business database. Then use a!queryEntity using the Appian data source to retrieve the data.
- C. Configure an expression-backed record type, calling an API to retrieve the data from the third- party database. Then, use a!queryRecordType to retrieve the data.
- D. In the Administration Console, configure the third-party database as a “New Data Source.” Then, use a!queryEntity to retrieve the data.
Answer:
D
Explanation:
Comprehensive and Detailed In-Depth Explanation:
As an Appian Lead Developer, designing a solution to query data from a third-party Oracle database
for display on an interface requires secure, efficient, and maintainable integration. The scenario
focuses on real-time retrieval for users, so the design must leverage Appian’s data connectivity
features. Let’s evaluate each option:
A . Configure a Query Database node within the process model. Then, type in the connection
information, as well as a SQL query to execute and return the data in process variables:
The Query Database node (part of the Smart Services) allows direct SQL execution against a
database, but it requires manual connection details (e.g., JDBC URL, credentials), which isn’t scalable
or secure for Production. Appian’s documentation discourages using Query Database for ongoing
integrations due to maintenance overhead, security risks (e.g., hardcoding credentials), and lack of
governance. This is better for one-off tasks, not real-time interface queries, making it unsuitable.
B . Configure a timed utility process that queries data from the third-party database daily, and stores
it in the Appian business database. Then use a!queryEntity using the Appian data source to retrieve
the data:
This approach syncs data daily into Appian’s business database (e.g., via a timer event and Query
Database node), then queries it with a!queryEntity. While it works for stale data, it introduces
latency (up to 24 hours) for users, which doesn’t meet real-time needs on an interface. Appian’s best
practices recommend direct data source connections for up-to-date data, not periodic caching,
unless latency is acceptable—making this inefficient here.
C . Configure an expression-backed record type, calling an API to retrieve the data from the third-
party database. Then, use a!queryRecordType to retrieve the data:
Expression-backed record types use expressions (e.g., a!httpQuery()) to fetch data, but they’re
designed for external APIs, not direct database queries. The scenario specifies an Oracle database,
not an API, so this requires building a custom REST service on the Oracle side, adding complexity and
latency. Appian’s documentation favors Data Sources for database queries over API calls when direct
access is available, making this less optimal and over-engineered.
D . In the Administration Console, configure the third-party database as a “New Data Source.” Then,
use a!queryEntity to retrieve the data:
This is the best choice. In the Appian Administration Console, you can configure a JDBC Data Source
for the Oracle database, providing connection details (e.g., URL, driver, credentials). This creates a
secure, managed connection for querying via a!queryEntity, which is Appian’s standard function for
Data Store Entities. Users can then retrieve data on interfaces using expression-backed records or
queries, ensuring real-time access with minimal latency. Appian’s documentation recommends Data
Sources for database integrations, offering scalability, security, and governance—perfect for this
requirement.
Conclusion: Configuring the third-party database as a New Data Source and using a!queryEntity (D) is
the recommended approach. It provides direct, real-time access to Oracle data for interface display,
leveraging Appian’s native data connectivity features and aligning with Lead Developer best practices
for third-party database integration.
Reference:
Appian Documentation: "Configuring Data Sources" (JDBC Connections and a!queryEntity).
Appian Lead Developer Certification: Data Integration Module (Database Query Design).
Appian Best Practices: "Retrieving External Data in Interfaces" (Data Source vs. API Approaches).
Comments
Question 5
Users must be able to navigate throughout the application while maintaining complete visibility in
the application structure and easily navigate to previous locations. Which Appian Interface Pattern
would you recommend?
- A. Use Billboards as Cards pattern on the homepage to prominently display application choices.
- B. Implement an Activity History pattern to track an organization’s activity measures.
- C. Implement a Drilldown Report pattern to show detailed information about report data.
- D. Include a Breadcrumbs pattern on applicable interfaces to show the organizational hierarchy.
Answer:
D
Explanation:
Comprehensive and Detailed In-Depth Explanation:
The requirement emphasizes navigation with complete visibility of the application structure and the
ability to return to previous locations easily. The Breadcrumbs pattern is specifically designed to
meet this need. According to Appian’s design best practices, the Breadcrumbs pattern provides a
visual trail of the user’s navigation path, showing the hierarchy of pages or sections within the
application. This allows users to understand their current location relative to the overall structure
and quickly navigate back to previous levels by clicking on the breadcrumb links.
Option A (Billboards as Cards): This pattern is useful for presenting high-level options or choices on a
homepage in a visually appealing way. However, it does not address navigation visibility or the ability
to return to previous locations, making it irrelevant to the requirement.
Option B (Activity History): This pattern tracks and displays a log of activities or actions within the
application, typically for auditing or monitoring purposes. It does not enhance navigation or provide
visibility into the application structure.
Option C (Drilldown Report): This pattern allows users to explore detailed data within reports by
drilling into specific records. While it supports navigation within data, it is not designed for general
application navigation or maintaining structural visibility.
Option D (Breadcrumbs): This is the correct choice as it directly aligns with the requirement. Per
Appian’s Interface Patterns documentation, Breadcrumbs improve usability by showing a hierarchical
path (e.g., Home > Section > Subsection) and enabling backtracking, fulfilling both visibility and
navigation needs.
Reference: Appian Design Guide - Interface Patterns (Breadcrumbs section), Appian Lead Developer
Training - User Experience Design Principles.
Comments
Question 6
DRAG DROP
You are selling up a new cloud environment. The customer already has a system of record for Its
employees and doesn't want to re-create them in Appian. so you are going to Implement LDAP
authentication.
What are the next steps to configure LDAP authentication?
To answer, move the appropriate steps from the Option list to the Answer List area, and arrange
them in the correct order. You may or may not use all the steps.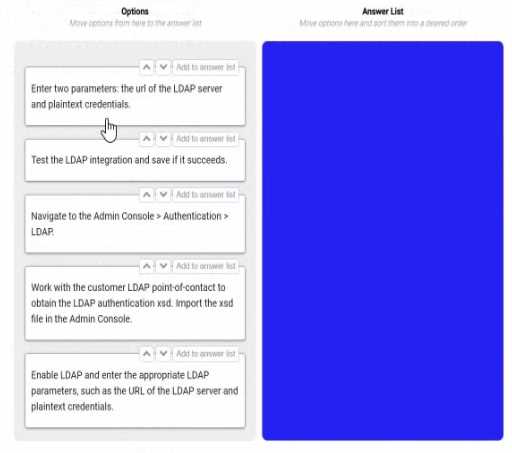
Answer:
None
Explanation:
Navigate to the Admin console > Authentication > LDAP. This is the first step, as it allows you to
access the settings and options for LDAP authentication in Appian.
Work with the customer LDAP point of contact to obtain the LDAP authentication xsd. Import the xsd
file in the Admin console. This is the second step, as it allows you to define the schema and structure
of the LDAP data that will be used for authentication in Appian. You will need to work with the
customer LDAP point of contact to obtain the xsd file that matches their LDAP server configuration
and data model. You will then need to import the xsd file in the Admin console using the Import
Schema button.
Enable LDAP and enter the LDAP parameters, such as the URL of the LDAP server and plaintext
credentials. This is the third step, as it allows you to enable and configure the LDAP authentication in
Appian. You will need to check the Enable LDAP checkbox and enter the required parameters, such as
the URL of the LDAP server, the plaintext credentials for connecting to the LDAP server, and the base
DN for searching for users in the LDAP server.
Test the LDAP integration and see if it succeeds. This is the fourth and final step, as it allows you to
verify and validate that the LDAP authentication is working properly in Appian. You will need to use
the Test Connection button to test if Appian can connect to the LDAP server successfully. You will also
need to use the Test User Lookup button to test if Appian can find and authenticate a user from the
LDAP server using their username and password.
Configuring LDAP authentication in Appian Cloud allows the platform to leverage an existing
employee system of record (e.g., Active Directory) for user authentication, avoiding manual user
creation. The process involves a series of steps within the Appian Administration Console, guided by
Appian’s Security and Authentication documentation. The steps must be executed in a logical order
to ensure proper setup and validation.
Navigate to the Admin Console > Authentication > LDAP:
The first step is to access the LDAP configuration section in the Appian Administration Console. This is
the entry point for enabling and configuring LDAP authentication, where administrators can define
the integration settings. Appian requires this initial navigation to begin the setup process.
Work with the customer LDAP point-of-contact to obtain the LDAP authentication xsd. Import the xsd
file in the Admin Console:
The next step involves gathering the LDAP schema definition (xsd file) from the customer’s LDAP
system (e.g., via their point-of-contact). This file defines the structure of the LDAP directory (e.g.,
user attributes). Importing it into the Admin Console allows Appian to map these attributes to its
user model, a critical step before enabling authentication, as outlined in Appian’s LDAP Integration
Guide.
Enable LDAP and enter the appropriate LDAP parameters, such as the URL of the LDAP server and
plaintext credentials:
After importing the schema, enable LDAP and configure the connection details. This includes
specifying the LDAP server URL (e.g., ldap://ldap.example.com) and plaintext credentials (or a secure
alternative like LDAPS with certificates). These parameters establish the connection to the
customer’s LDAP system, a prerequisite for testing, as per Appian’s security best practices.
Test the LDAP integration and save if it succeeds:
The final step is to test the configuration to ensure Appian can authenticate against the LDAP server.
The Admin Console provides a test option to verify connectivity and user synchronization. If
successful, saving the configuration applies the settings, completing the setup. Appian recommends
this validation step to avoid misconfigurations, aligning with the iterative testing approach in the
documentation.
Unused Option:
Enter two parameters: the URL of the LDAP server and plaintext credentials:
This step is redundant and not used. The equivalent action is covered under "Enable LDAP and enter
the appropriate LDAP parameters," which is more comprehensive and includes enabling the feature.
Including both would be duplicative, and Appian’s interface consolidates parameter entry with
enabling.
Ordering Rationale:
The sequence follows a logical workflow: navigation to the configuration area, schema import for
structure, parameter setup for connectivity, and testing/saving for validation. This aligns with
Appian’s step-by-step LDAP setup process, ensuring each step builds on the previous one without
requiring backtracking.
The unused option reflects the question’s allowance for not using all steps, indicating flexibility in the
process.
Reference: Appian Documentation - Security and Authentication Guide, Appian Administration
Console - LDAP Configuration, Appian Lead Developer Training - Integration Setup.
Comments
Question 7
You are in a backlog refinement meeting with the development team and the product owner. You
review a story for an integration involving a third-party system. A payload will be sent from the
Appian system through the integration to the third-party system. The story is 21 points on a Fibonacci
scale and requires development from your Appian team as well as technical resources from the third-
party system. This item is crucial to your project’s success. What are the two recommended steps to
ensure this story can be developed effectively?
- A. Acquire testing steps from QA resources.
- B. Identify subject matter experts (SMEs) to perform user acceptance testing (UAT).
- C. Maintain a communication schedule with the third-party resources.
- D. Break down the item into smaller stories.
Answer:
C, D
Explanation:
Comprehensive and Detailed In-Depth Explanation:
This question involves a complex integration story rated at 21 points on the Fibonacci scale,
indicating significant complexity and effort. Appian Lead Developer best practices emphasize
effective collaboration, risk mitigation, and manageable development scopes for such scenarios. The
two most critical steps are:
Option C (Maintain a communication schedule with the third-party resources):
Integrations with third-party systems require close coordination, as Appian developers depend on
external teams for endpoint specifications, payload formats, authentication details, and testing
support. Establishing a regular communication schedule ensures alignment on requirements,
timelines, and issue resolution. Appian’s Integration Best Practices documentation highlights the
importance of proactive communication with external stakeholders to prevent delays and
misunderstandings, especially for critical project components.
Option D (Break down the item into smaller stories):
A 21-point story is considered large by Agile standards (Fibonacci scale typically flags anything above
13 as complex). Appian’s Agile Development Guide recommends decomposing large stories into
smaller, independently deliverable pieces to reduce risk, improve testability, and enable iterative
progress. For example, the integration could be split into tasks like designing the payload structure,
building the integration object, and testing the connection—each manageable within a sprint. This
approach aligns with the principle of delivering value incrementally while maintaining quality.
Option A (Acquire testing steps from QA resources): While QA involvement is valuable, this step is
more relevant during the testing phase rather than backlog refinement or development preparation.
It’s not a primary step for ensuring effective development of the story.
Option B (Identify SMEs for UAT): User acceptance testing occurs after development, during the
validation phase. Identifying SMEs is important but not a key step in ensuring the story is developed
effectively during the refinement and coding stages.
By choosing C and D, you address both the external dependency (third-party coordination) and
internal complexity (story size), ensuring a smoother development process for this critical
integration.
Reference: Appian Lead Developer Training - Integration Best Practices, Appian Agile Development
Guide - Story Refinement and Decomposition.
Comments
Question 8
You are planning a strategy around data volume testing for an Appian application that queries and
writes to a MySQL database. You have administrator access to the Appian application and to the
database. What are two key considerations when designing a data volume testing strategy?
- A. Data from previous tests needs to remain in the testing environment prior to loading prepopulated data.
- B. Large datasets must be loaded via Appian processes.
- C. The amount of data that needs to be populated should be determined by the project sponsor and the stakeholders based on their estimation.
- D. Testing with the correct amount of data should be in the definition of done as part of each sprint.
- E. Data model changes must wait until towards the end of the project.
Answer:
C, D
Explanation:
Comprehensive and Detailed In-Depth Explanation:
Data volume testing ensures an Appian application performs efficiently under realistic data loads,
especially when interacting with external databases like MySQL. As an Appian Lead Developer with
administrative access, the focus is on scalability, performance, and iterative validation. The two key
considerations are:
Option C (The amount of data that needs to be populated should be determined by the project
sponsor and the stakeholders based on their estimation):
Determining the appropriate data volume is critical to simulate real-world usage. Appian’s
Performance Testing Best Practices recommend collaborating with stakeholders (e.g., project
sponsors, business analysts) to define expected data sizes based on production scenarios. This
ensures the test reflects actual requirements—like peak transaction volumes or record counts—
rather than arbitrary guesses. For example, if the application will handle 1 million records in
production, stakeholders must specify this to guide test data preparation.
Option D (Testing with the correct amount of data should be in the definition of done as part of each
sprint):
Appian’s Agile Development Guide emphasizes incorporating performance testing (including data
volume) into the Definition of Done (DoD) for each sprint. This ensures that features are validated
under realistic conditions iteratively, preventing late-stage performance issues. With admin access,
you can query/write to MySQL and assess query performance or write latency with the specified data
volume, aligning with Appian’s recommendation to “test early and often.”
Option A (Data from previous tests needs to remain in the testing environment prior to loading
prepopulated data): This is impractical and risky. Retaining old test data can skew results, introduce
inconsistencies, or violate data integrity (e.g., duplicate keys in MySQL). Best practices advocate for a
clean, controlled environment with fresh, prepopulated data per test cycle.
Option B (Large datasets must be loaded via Appian processes): While Appian processes can load
data, this is not a requirement. With database admin access, you can use SQL scripts or tools like
MySQL Workbench for faster, more efficient data population, bypassing Appian process overhead.
Appian documentation notes this as a preferred method for large datasets.
Option E (Data model changes must wait until towards the end of the project): Delaying data model
changes contradicts Agile principles and Appian’s iterative design approach. Changes should occur as
needed throughout development to adapt to testing insights, not be deferred.
Reference: Appian Lead Developer Training - Performance Testing Best Practices, Appian
Documentation - Data Management and Testing Strategies.
Comments
Question 9
Your application contains a process model that is scheduled to run daily at a certain time, which kicks
off a user input task to a specified user on the 1st time zone for morning data collection. The time
zone is set to the (default) pm!timezone. In this situation, what does the pm!timezone reflect?
- A. The time zone of the server where Appian is installed.
- B. The time zone of the user who most recently published the process model.
- C. The default time zone for the environment as specified in the Administration Console.
- D. The time zone of the user who is completing the input task.
Answer:
C
Explanation:
Comprehensive and Detailed In-Depth Explanation:
In Appian, the pm!timezone variable is a process variable automatically available in process models,
reflecting the time zone context for scheduled or time-based operations. Understanding its behavior
is critical for scheduling tasks accurately, especially in scenarios like this where a process runs daily
and assigns a user input task.
Option C (The default time zone for the environment as specified in the Administration Console):
This is the correct answer. Per Appian’s Process Model documentation, when a process model uses
pm!timezone and no custom time zone is explicitly set, it defaults to the environment’s time zone
configured in the Administration Console (under System > Time Zone settings). For scheduled
processes, such as one running “daily at a certain time,” Appian uses this default time zone to
determine when the process triggers. In this case, the task assignment occurs based on the schedule,
and pm!timezone reflects the environment’s setting, not the user’s location.
Option A (The time zone of the server where Appian is installed): This is incorrect. While the server’s
time zone might influence underlying system operations, Appian abstracts this through the
Administration Console’s time zone setting. The pm!timezone variable aligns with the configured
environment time zone, not the raw server setting.
Option B (The time zone of the user who most recently published the process model): This is
irrelevant. Publishing a process model does not tie pm!timezone to the publisher’s time zone.
Appian’s scheduling is system-driven, not user-driven in this context.
Option D (The time zone of the user who is completing the input task): This is also incorrect. While
Appian can adjust task display times in the user interface to the assigned user’s time zone (based on
their profile settings), the pm!timezone in the process model reflects the environment’s default time
zone for scheduling purposes, not the assignee’s.
For example, if the Administration Console is set to EST (Eastern Standard Time), the process will
trigger daily at the specified time in EST, regardless of the assigned user’s location. The “1st time
zone” phrasing in the question appears to be a typo or miscommunication, but it doesn’t change the
fact that pm!timezone defaults to the environment setting.
Reference: Appian Documentation - Process Variables (pm!timezone), Appian Lead Developer
Training - Process Scheduling and Time Zone Management, Administration Console Guide - System
Settings.
Comments
Question 10
You are taking your package from the source environment and importing it into the target
environment.
Review the errors encountered during inspection:
What is the first action you should take to Investigate the issue?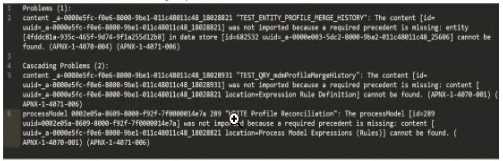
- A. Check whether the object (UUID ending in 18028821) is included in this package
- B. Check whether the object (UUD ending in 7t00000i4e7a) is included in this package
- C. Check whether the object (UUID ending in 25606) is included in this package
- D. Check whether the object (UUID ending in 18028931) is included in this package
Answer:
B
Explanation:
The error log provided indicates issues during the package import into the target environment, with
multiple objects failing to import due to missing precedents. The key error messages highlight
specific UUIDs associated with objects that cannot be resolved. The first error listed states:
"‘TEST_ENTITY_PROFILE_MERGE_HISTORY’: The content [id=uuid-a-0000m5fc-f0e6-8000-9b01-
011c48011c48, 18028821] was not imported because a required precedent is missing: entity [uuid=a-
0000m5fc-f0e6-8000-9b01-011c48011c48, 18028821] cannot be found..."
According to Appian’s Package Deployment Best Practices, when importing a package, the first step
in troubleshooting is to identify the root cause of the failure. The initial error in the log points to an
entity object with a UUID ending in 18028821, which failed to import due to a missing precedent.
This suggests that the object itself or one of its dependencies (e.g., a data store or related entity) is
either missing from the package or not present in the target environment.
Option A (Check whether the object (UUID ending in 18028821) is included in this package): This is
the correct first action. Since the first error references this UUID, verifying its inclusion in the package
is the logical starting point. If it’s missing, the package export from the source environment was
incomplete. If it’s included but still fails, the precedent issue (e.g., a missing data store) needs further
investigation.
Option B (Check whether the object (UUID ending in 7t00000i4e7a) is included in this package): This
appears to be a typo or corrupted UUID (likely intended as something like "7t000014e7a" or similar),
and it’s not referenced in the primary error. It’s mentioned later in the log but is not the first issue to
address.
Option C (Check whether the object (UUID ending in 25606) is included in this package): This UUID is
associated with a data store error later in the log, but it’s not the first reported issue.
Option D (Check whether the object (UUID ending in 18028931) is included in this package): This
UUID is mentioned in a subsequent error related to a process model or expression rule, but it’s not
the initial failure point.
Appian recommends addressing errors in the order they appear in the log to systematically resolve
dependencies. Thus, starting with the object ending in 18028821 is the priority.
Reference: Appian Documentation - Package Deployment and Troubleshooting, Appian Lead
Developer Training - Error Handling and Import/Export.
Comments
Page 1 out of 4
Viewing questions 1-10 out of 45
page 2