Question 1
A query returns a partial list of possible values.
Which flow control module should be used to ensure all the possible results are queried?
- A. Aggregator
- B. Repeater
- C. Iterator
- D. Router
Answer:
B
Explanation:
Understanding the Requirement:
The query returns only a partial list of possible values.
The task is to ensure that all results are processed by iterating through multiple queries or pages of
data.
Why Option B ("Repeater") is Correct:
The Repeater module is designed to repeat an operation a specified number of times or until a
condition is met.
It is commonly used for querying paginated data or when a system limits the number of records
returned in a single request.
In this case, the Repeater ensures all possible values are queried by making additional requests to
retrieve subsequent pages or results.
Why the Other Options are Incorrect:
Option A ("Aggregator"):
The Aggregator combines multiple data bundles into a single output. It does not handle iterative
queries or pagination.
Option C ("Iterator"):
The Iterator splits an array into individual items for processing. It does not handle querying for
additional data or looping through requests.
Option D ("Router"):
The Router splits the flow of a scenario into multiple paths based on conditions. It is unrelated to
iterative querying.
Steps to Configure the Repeater:
Add the Repeater module to your scenario.
Configure the number of repetitions or the condition to continue querying (e.g., based on the
presence of additional data).
Link the Repeater to the module responsible for retrieving the data, ensuring it processes all
available results.
How This Solves the Problem:
The Repeater module ensures that all possible results are queried by iteratively sending requests
until no more data is available.
Reference and Supporting Documentation:
Adobe Workfront Fusion: Repeater Module Documentation
Workfront Community: Using Flow Control Modules
Comments
Question 2
Data coming from a third-party system contains a field that needs to be transformed into one of
three possible choices.
Which function supports this transformation?
- A. Switch
- B. Slice
- C. Split
Answer:
A
Explanation:
Understanding the Requirement:
The field data from a third-party system needs to be transformed into one of three possible choices.
This transformation implies conditional logic, where the output depends on the value of the input
field.
Why Option A ("Switch") is Correct:
The Switch function evaluates a given input against multiple cases and outputs a corresponding value
based on the matched condition.
For example:
switch(field, "value1", "choice1", "value2", "choice2", "defaultChoice")
If field equals "value1", the output is "choice1".
If field equals "value2", the output is "choice2".
If no conditions match, the output is "defaultChoice".
This functionality perfectly fits the requirement to transform the input into one of three possible
choices.
Why the Other Options are Incorrect:
Option B ("Slice"):
The slice function is used for extracting a portion of a string or array but does not support conditional
transformations.
Option C ("Split"):
The split function divides a string into an array based on a specified delimiter. It is not designed for
conditional logic or value mapping.
How This Solves the Problem:
The Switch function allows flexible and dynamic transformations, ensuring the field data is mapped
to the correct choice based on its value.
Reference and Supporting Documentation:
Adobe Workfront Fusion Functions Documentation
Workfront Community: Using the Switch Function for Conditional Logic
Comments
Question 3
A Fusion user is developing a scenario. The first half of the scenario needs to be tested for
consistency. No additional actions are to be executed.
Which control module is required to disable the execution of subsequent modules?
- A. Router
- B. Sleep
- C. Ignore
- D. Break
Answer:
D
Explanation:
Understanding the Requirement:
The user wants to test the first half of the scenario for consistency without executing the remaining
modules.
This requires halting further execution after a specific point in the scenario.
Why Option D ("Break") is Correct:
The Break module is a flow control module in Adobe Workfront Fusion that stops the execution of all
subsequent modules in the scenario.
It is specifically designed for scenarios where you want to terminate execution after testing or
processing a portion of the flow.
Example Use Case: After ensuring the first set of modules processes data correctly, the Break module
prevents the execution of later modules to avoid unintended actions or changes.
Why the Other Options are Incorrect:
Option A ("Router"):
The Router splits the execution flow into multiple branches but does not stop the execution of
subsequent modules.
Option B ("Sleep"):
The Sleep module pauses execution for a specified time but does not disable subsequent modules
permanently.
Option C ("Ignore"):
There is no "Ignore" module in Workfront Fusion.
Steps to Use the Break Module:
Insert the Break module at the point where you want to stop execution.
Save and run the scenario to test the flow up to the Break module.
Once satisfied with the results, remove or bypass the Break module to continue testing or finalizing
the full scenario.
How This Solves the Problem:
The Break module allows targeted testing of specific sections of the scenario while preventing
unwanted execution of subsequent actions, making it a safe and efficient way to debug workflows.
Reference and Supporting Documentation:
Adobe Workfront Fusion Flow Control Modules Documentation
Workfront Community: Using the Break Module in Scenario Development
Comments
Question 4
A CSV export from another system provides columns of information about Purchase Orders. The
graphic below includes information from each column and an example of data from one row:
The customer wants this information in the title of their Workfront projects in the following order:
1.PO#
2. Name
3. PO Fulfillment Date
4. If a discount was given, include the Discount% and the Approver's Last Name.
Ex. 2837 - Compendium-Premium Running Shoes - 21 /02/16 -15% Discount - UserLast Which
expression below represents the project name that the customer wants?
A.
B.
C.
D.
- A. Option A
- B. Option B
- C. Option C
- D. Option D
Answer:
A
Explanation:
Understanding the Requirement:
The project name in Workfront must include:
Purchase Order Number (PO#).
Name of the product.
PO Fulfillment Date (formatted as YY/MM/DD).
If a discount is provided, append the discount percentage and the approver's last name in the
format: 15% Discount - UserLast.
Example Output:
sql
Copy
2837 - Compendium-Premium Running Shoes - 21/02/16 - 15% Discount - UserLast
Why Option A is Correct:
The expression in Option A achieves the desired result step-by-step:
3.PO#: Includes the PO number.
3.Name: Appends the name of the product.
formatDate(3.PO Fulfillment Date, YY/MM/DD): Formats the PO Fulfillment Date in the desired
YY/MM/DD format.
if(3.Discount Provided? = "Yes"; "- " + 3.Discount % + " Discount - " + 3.Approver Last Name):
Uses the if function to check if a discount was provided.
If "Yes," it appends the discount percentage (3.Discount %) and approver's last name (3.Approver
Last Name) with the required format.
Why the Other Options are Incorrect:
Option B:
The expression is incorrect because it places if(3.Discount Provided?...) directly after PO Fulfillment
Date without using formatDate for date formatting. This results in an unformatted date.
Option C:
Uses parseDate instead of formatDate, which is incorrect in this context. parseDate is used to
interpret strings as dates, not to format dates for output.
Option D:
The expression does not include any conditional logic for checking if a discount is provided. It simply
appends Discount - Approver Last Name regardless of whether a discount was given.
Steps to Use the Expression in Workfront Fusion:
Place the expression in the module that defines the project title in Workfront.
Map the fields (PO#, Name, PO Fulfillment Date, etc.) to the respective columns from the CSV data.
Test the scenario to ensure the output matches the desired format.
Final Expression (Option A):
3.PO# + " - " + 3.Name + " - " + formatDate(3.PO Fulfillment Date; YY/MM/DD) + if(3.Discount
Provided? = "Yes"; " - " + 3.Discount % + " Discount - " + 3.Approver Last Name)
Reference and Supporting Documentation:
Adobe Workfront Fusion Functions Documentation
Workfront Community: Handling Conditional Logic and Date Formatting
Comments
Question 5
Given the array below, a user wants a comma-separated string of all stat names.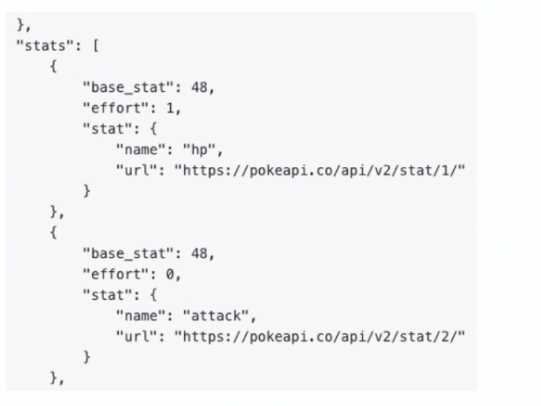
What is the correct expression?
A.
B.
C.
D.
- A. Option A
- B. Option B
- C. Option C
- D. Option D
Answer:
B
Explanation:
Understanding the Requirement:
The input is an array containing objects, and the goal is to extract all the stat.name values into a
comma-separated string.
Example Input:
[
{
"base_stat": 48,
"effort": 1,
"stat": {
"name": "hp",
"url": "https://pokeapi.co/api/v2/stat/1/"
}
},
{
"base_stat": 48,
"effort": 0,
"stat": {
"name": "attack",
"url": "https://pokeapi.co/api/v2/stat/2/"
}
}
]
Example Output:
"hp, attack"
Why Option B is Correct:
The expression join(map(2.data: stats[]; stats.stat.name); ", "):
map: Iterates through each object in the array (2.data: stats[]) and extracts the stat.name field.
join: Combines the extracted values into a single string, separated by a comma and space (", ").
Breaking it down:
map(2.data: stats[]; stats.stat.name) → Creates an array of names: ["hp", "attack"].
join(...; ", ") → Converts the array into the string "hp, attack".
Why the Other Options are Incorrect:
Option A: join(2.data: stats[]; stat.name; ", ")
This syntax is incorrect because it attempts to directly access stat.name within the join function
without first mapping the values.
Option C: join(map(2.data: stats[]; stat.name); ", ")
The mapping references stat.name directly but does not account for the nested structure
(stats.stat.name).
Option D: join(flatten(2.data: stats[]); ", ")
The flatten function is unnecessary here as the data is already structured. It would not properly
extract the stat.name values.
Steps to Implement in Workfront Fusion:
Add a Mapping/Transformation Module.
Use the join(map(...)) function as described to transform the input array into a comma-separated
string.
Test the output to ensure it correctly generates the desired format.
How This Solves the Problem:
The map function ensures the proper extraction of nested stat.name values.
The join function combines these values into the desired format efficiently.
Reference and Supporting Documentation:
Adobe Workfront Fusion Functions Documentation
Workfront Community: Using Map and Join Functions
The combination of map and join ensures that the stat names are extracted and formatted into a
single comma-separated string, as required.
Comments
Question 6
Which action makes it possible to see the exact API request and the response a module executes?
- A. Using the Bundle Inspector
- B. Using the execution history
- C. Using the Fusion DevTool scenario debugger
- D. Using the Fusion DevTool error evaluator
Answer:
B
Explanation:
Understanding the Requirement:
The user needs to view the exact API request and the corresponding response a module executes in
Adobe Workfront Fusion.
This is critical for debugging, troubleshooting, or validating API operations within scenarios.
Why Option B is Correct:
Execution History:
The execution history logs detailed information about every module that runs in a scenario.
It provides access to the API request sent, including the headers, parameters, and body.
It also displays the API response received, including HTTP status codes, returned data, and error
messages (if applicable).
This feature is indispensable for debugging and verifying the behavior of modules.
Why the Other Options are Incorrect:
Option A ("Using the Bundle Inspector"):
The Bundle Inspector provides a view of processed data bundles but does not include API
request/response details.
Option C ("Using the Fusion DevTool scenario debugger"):
Fusion does not have a specific "DevTool debugger." The execution history serves this purpose.
Option D ("Using the Fusion DevTool error evaluator"):
While error logs help evaluate issues, they do not directly show the API request/response unless an
error occurs. Execution history is a more comprehensive source of this data.
Steps to View Execution History:
Run the scenario or inspect a previously executed scenario.
Navigate to the Execution History tab for the scenario.
Select a specific module to view its details.
Inspect the API request and response, which includes all relevant parameters and data.
Reference and Supporting Documentation:
Adobe Workfront Fusion Documentation: Execution History
Workfront Community: Debugging with Execution History
Comments
Question 7
Which statement about Workfront Fusion templates is accurate?
- A. Fusion templates are publicly shared scenarios that support the quick development of automations for Workfront enterprise-level customers
- B. Fusion templates are only created and shared by Workfront to help customers with common workflow automations
- C. Fusion templates allow a user to swap connections in commonly used scenarios to support multiple team automations
- D. Fusion templates help customers build Workfront automations for Workfront using simple walk- through guides
Answer:
C
Explanation:
Understanding the Role of Fusion Templates:
Fusion templates are prebuilt scenario structures designed to help users set up automations
efficiently by reusing common workflows.
They are flexible and can be customized based on the organization’s requirements.
Why Option C is Correct:
Swap Connections:
Fusion templates allow users to replace connections (e.g., API connections, authentication tokens) to
adapt the scenario for different teams, departments, or environments.
This makes templates versatile for reuse in scenarios where the logic remains the same, but the data
sources or destinations differ.
Why the Other Options are Incorrect:
Option A ("Fusion templates are publicly shared scenarios for enterprise-level customers"):
Fusion templates are not public. They are created by users or Workfront admins for internal use
within organizations.
Option B ("Fusion templates are only created and shared by Workfront"):
While Workfront provides some default templates, users can also create custom templates tailored
to their needs.
Option D ("Fusion templates help customers build Workfront automations using simple walk-through
guides"):
Fusion templates do not include walkthrough guides. They are structural frameworks for scenarios
that users can modify or replicate.
How Fusion Templates Help:
Simplify repetitive workflows: Users don’t need to recreate scenarios from scratch.
Enable scalability: Templates can be shared across teams for consistent processes.
Save time: By swapping connections, the same scenario logic can be used for different use cases.
Reference and Supporting Documentation:
Adobe Workfront Fusion Templates Documentation
Workfront Community: Best Practices for Fusion Templates
Fusion templates enable efficient automation setup by supporting reusable workflows with
adaptable connections, making them a powerful tool for scaling team-level automation.
Comments
Question 8
A customer wants all their Salesforce Opportunities to sync with their connected projects in
Workfront -approximately 20,000+ projects.
After the admin sets a Workfront Fusion scenario to run each night and perform this action, the
scenario is run once to test. After 40 minutes, it unexpectedly stops running.
Why did this occur?
- A. Workfront has a limit to the number of API calls it can receive and stopped the scenario from running
- B. Workfront Fusion occasionally times out if trying to process over 2000 records within a 40-minute period
- C. Workfront Fusion has an execution timeout and likely stopped the scenario from running
- D. The Workfront API stops integration webhooks if they are hit more than 2000 times in a 10 minute period
Answer:
C
Explanation:
Understanding the Issue:
The customer is syncing 20,000+ Salesforce Opportunities with Workfront projects using a scheduled
Fusion scenario.
After running for 40 minutes, the scenario unexpectedly stops.
Why Option C is Correct:
Workfront Fusion Execution Timeout:
Fusion scenarios have a default execution timeout of 40 minutes per run.
If the scenario exceeds this time limit, Fusion automatically stops the execution to avoid resource
overuse.
Handling Large Data Sets:
Scenarios involving large datasets (like syncing 20,000+ records) may require optimizations, such as
breaking the data into smaller chunks using paginated requests or iterators.
In this case, the scenario stopped because the execution timeout was reached, not due to API limits
or webhook restrictions.
Why the Other Options are Incorrect:
Option A ("Workfront API call limit"):
While Workfront does have API rate limits, they are generally generous and not the reason for the
scenario stopping. Fusion scenarios are designed to manage API calls efficiently.
Option B ("Fusion times out if processing over 2000 records in 40 minutes"):
This is incorrect because Fusion does not have a hard limit on the number of records processed in 40
minutes. The timeout is time-based, not record-based.
Option D ("Workfront API stops webhooks after 2000 hits in 10 minutes"):
This does not apply to Fusion scenarios. Webhooks are separate from the API calls initiated by
Fusion.
How to Resolve the Issue:
Split the Data: Use pagination or batch processing to divide the 20,000+ records into smaller chunks
(e.g., 1,000 or 2,000 records per run).
Adjust Scheduling: Schedule the scenario to run more frequently with smaller batches, ensuring all
records are synced over multiple runs.
Use Iterators: Add an Iterator module to loop through smaller subsets of data, preventing the
scenario from exceeding the execution timeout.
Steps to Optimize the Scenario:
Add a Search Module to retrieve opportunities in smaller batches (e.g., using limits or pagination
parameters).
Use a Repeater Module to process each batch iteratively.
Save the scenario and schedule it to run nightly or more frequently, depending on the sync
requirements.
Reference and Supporting Documentation:
Adobe Workfront Fusion: Execution Timeout Limits
Workfront Community: Managing Large Data Sets in Fusion Scenarios
By optimizing the scenario to handle smaller batches of data, the admin can avoid the execution
timeout issue and ensure successful syncing of Salesforce Opportunities with Workfront projects.
Comments
Question 9
A web service provides the following array named "Colors":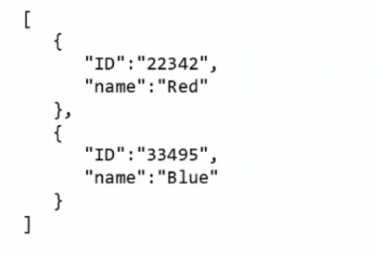
Which expression returns the first ID in the array?
A.
B.
C.
- A. Option A
- B. Option B
- C. Option C
Answer:
B
Explanation:
Understanding the Array and the Task:
Input Array (Colors):
[
{ "ID": "22342", "name": "Red" },
{ "ID": "33495", "name": "Blue" }
]
Goal: Extract the first ID from the array, which is "22342".
Why Option B is Correct:
The expression get(map(2.Colors; ID); 1):
map(2.Colors; ID): Iterates over the array 2.Colors and extracts the ID field from each object. This
creates a new array containing just the IDs:
["22342", "33495"].
get(...; 1): Retrieves the first element of the newly created array, which is "22342".
Why the Other Options are Incorrect:
Option A (map(2.Colors; ID; ID; 1)):
This syntax is invalid because the additional ID and 1 parameters are misplaced. The map function
requires only two arguments: the array and the field to map.
Option C (map(get(2.Colors; ID); 1)):
This incorrectly attempts to use get inside map. The get function does not return a field for mapping,
so the syntax is invalid.
How the Expression Works:
Step 1: map(2.Colors; ID)
Extracts the ID field from each object in the Colors array.
Output: ["22342", "33495"].
Step 2: get(...; 1)
Retrieves the first element of the mapped array.
Output: "22342".
Use Case in Workfront Fusion:
This approach is commonly used when processing arrays in Fusion scenarios, ensuring specific
elements are accessed without additional looping or complex logic.
Reference and Supporting Documentation:
Adobe Workfront Fusion Functions Documentation
Workfront Community: Using Map and Get Functions
By combining map and get, this expression efficiently extracts the first ID from the array, ensuring
correct and reliable results.
Comments
Question 10
Refer to the exhibit.
In this image,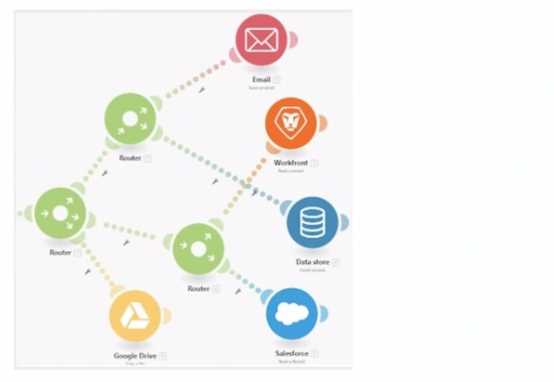
all items are displayed in a position that does not hide their execution sequence. In what order do
the modules execute?
- A. Google Drive > Email > Workfront > Data Store > Salesforce
- B. Email > Workfronl > Data Store > Salesforce > Google Drive
- C. Email > Data Store > Workfront > Salesforce >
- D. Google Drive Google Drive > Email > Data Store > Workfront > Salesforce
Answer:
D
Explanation:
Understanding the Diagram:
The image depicts a Workfront Fusion scenario using Routers to split and manage multiple execution
paths.
Fusion executes modules in a left-to-right and top-to-bottom sequence along each path. Routers
direct the flow to downstream modules.
Determining the Execution Sequence:
Path 1:
The first path begins with Google Drive. The Router branches out, directing execution sequentially to
other modules.
Path 2:
The second path starts with Email and continues downwards through the remaining modules.
Order Within Branches:
After passing through a Router, each branch completes its sequence of modules before moving to the
next Router.
Why Option D is Correct:
Execution begins from the leftmost module (Google Drive) and flows rightward. The sequence is as
follows:
Google Drive
Email
Data Store
Workfront
Salesforce
This matches the visual layout and Fusion's execution rules for scenarios with Routers.
Why the Other Options are Incorrect:
Option A ("Google Drive > Email > Workfront > Data Store > Salesforce"):
Incorrect because Workfront does not precede Data Store in the execution order.
Option B ("Email > Workfront > Data Store > Salesforce > Google Drive"):
Incorrect because execution begins with Google Drive, not Email.
Option C ("Email > Data Store > Workfront > Salesforce"):
Incorrect because it excludes Google Drive as the starting point and places modules out of sequence.
Execution Rules in Workfront Fusion:
Fusion executes modules in the order they appear visually, starting from left to right and top to
bottom within each branch.
Routers split the execution into separate branches, which are completed sequentially.
Reference and Supporting Documentation:
Adobe Workfront Fusion: Execution Flow Rules
Workfront Community: Understanding Router and Module Execution
The correct execution sequence is Google Drive > Email > Data Store > Workfront > Salesforce,
ensuring all paths are processed as per the scenario's layout.
Comments
Page 1 out of 5
Viewing questions 1-10 out of 51
page 2